

Structure and Functions of Microscope Parts Explained with Diagram
A microscope is an essential tool in biology laboratories, enabling visualization of organisms and structures too small for the naked eye, such as cells and microorganisms. At its core, a microscope uses special lenses to magnify and contrast tiny specimens, allowing students and scientists to study their features in detail. This ability supports the study of plant and animal cells, bacteria, and other microscopic life, making the microscope central in biological research and education.
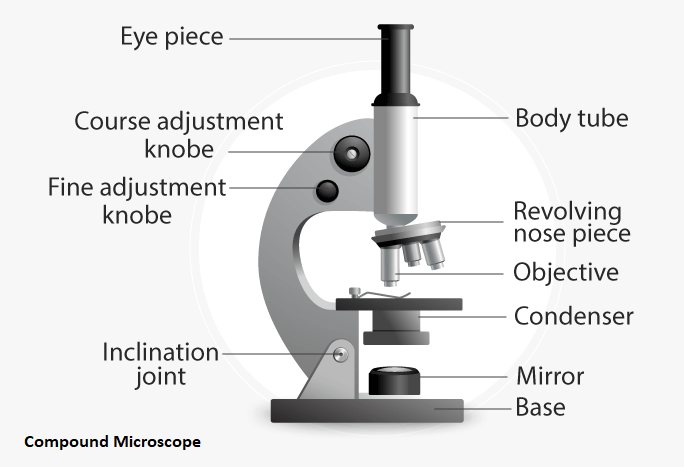
Parts of a Microscope with Functions and Labeled Diagram
Modern microscopes are constructed using both structural and optical components, carefully designed for stability, magnification, and clarity. Understanding how these parts work together helps users focus specimens, adjust the amount of light, and view fine details with ease. Both light and advanced microscopes (such as electron or fluorescence types) share these concepts, but the compound light microscope is most common in school and undergraduate labs.
There are two main categories for the parts of a microscope:
- Structural parts for support and stability
- Optical parts for magnification and image formation
Structural Parts of a Microscope and Their Functions
- Head (Body): The upper section that holds the optical components for image formation.
- Arm: The curved, upright portion connecting the base and head; used to carry the microscope and provide strong support.
- Base: The bottom part that supports the microscope, ensuring stability on the lab bench.
Optical Parts of a Microscope and Their Functions
Optical parts are responsible for magnifying and producing a visual image of the specimen placed on a glass slide.
- Ocular Lens (Eyepiece): Located at the top, it is the lens you look through. Common magnification is 10x, but variants between 5x and 30x exist.
- Objective Lenses: Found on the nosepiece, usually 1–4 lenses with varying magnifications (commonly 4x, 10x, 40x, and 100x). Used for primary magnification of the image.
- Revolving Nosepiece: Holds and allows rotation between objective lenses for different magnifications.
- Stage: Flat platform for placing microscope slides, often equipped with stage clips or a mechanical stage to hold the specimen steady.
- Aperture: Central opening in the stage through which light passes to reach the specimen.
- Condenser: Focuses and concentrates light from the illuminator onto the specimen. High-quality microscopes may have a movable Abbe condenser for enhanced resolution at high magnification.
- Diaphragm (Iris or Disc): Located under the stage. Controls the amount of light reaching the specimen, improving contrast and clarity.
- Illuminator (Light Source): Provides the necessary light for viewing. Some microscopes use an electric bulb, others rely on a mirror to reflect light.
- Coarse Adjustment Knob: Moves the stage up and down rapidly for general focusing.
- Fine Adjustment Knob: Allows for very slow, precise movement of the stage to obtain a sharp, detailed focus, especially under higher magnification.
- Rack Stop: Prevents the objective lens from moving too close to the slide, protecting both specimen and lens.
How Does a Microscope Work?
To use a light microscope, a thin section of specimen is placed on the stage. Light passes from the illuminator through the condenser and diaphragm, illuminating the sample. As light travels through the specimen, it enters the objective lens, where it is magnified. This preliminary image is further enlarged by the eyepiece, allowing the user to see a highly magnified, clear image.
Microscope Parts and Their Functions: Summary Table
| Part Name | Location | Function |
|---|---|---|
| Ocular Lens (Eyepiece) | Top of microscope | Magnifies the pre-formed image, typically 10x magnification |
| Objective Lenses | On the nosepiece, near the specimen | Provide various magnifications (4x–100x) for detailed viewing |
| Revolving Nosepiece | Attached to the bottom of the head | Rotates to switch between objective lenses |
| Stage | Below the objectives | Supports the slide; may have clips for stabilization |
| Condenser | Below the stage | Focuses light on the specimen for sharp images |
| Diaphragm | Adjacent to condenser | Adjusts light intensity and contrast |
| Coarse Adjustment Knob | Side of microscope | Moves stage for rough focusing |
| Fine Adjustment Knob | Next to coarse knob | Sharp, precise focusing at high magnification |
| Arm | Connects base to head | Structural support and carrying handle |
| Base | Bottommost section | Ensures microscope stability |
| Illuminator | Below stage/base | Provides or reflects light to illuminate specimen |
| Rack Stop | Near stage adjustment | Prevents lens from damaging the slide |
Key Points and Definitions
- Magnification: The increase in visible size of an object. Calculated by multiplying the eyepiece and objective lens powers.
- Resolution: The ability to distinguish closely placed points as separate. A crucial factor for image clarity.
- Rack Stop: A safeguard to avoid damage by preventing excessive upward movement of the stage towards the lenses.
- Abbe Condenser: Specialized, high-quality condenser for extremely sharp images at high magnifications (400X and above).
Types of Microscopes: Comparison
| Type | Key Feature | Typical Use |
|---|---|---|
| Light Microscope | Uses visible light, basic school labs | Viewing cells, tissues, bacteria |
| Dark-Field Microscope | Oblique lighting increases contrast | Studying living, unstained specimens |
| Phase Contrast Microscope | Enhances contrast in transparent samples | Observation of internal cell structures |
| Electron Microscope | Uses electrons, very high resolution | Detailed study of cell organelles |
| Fluorescent Microscope | Detects fluorescence in labeled samples | Molecular and cell biology research |
Practice: Microscope Diagram Worksheet and Next Steps
For revision, try drawing a labeled diagram of the compound microscope, marking each part and writing its function beside it. You can also test your understanding using available blank diagram worksheets and practice questions on related platforms.
- For further reading, diagrammatic practice, and structured resources, visit Compound Microscope Parts and Microscope Structure, Parts, and Functions on Vedantu.
Mastering the structure and function of microscope parts builds a foundation for success in biology exams and lab work. By practicing labeled diagrams and understanding each component's function, students can confidently approach practicals and theory questions alike.


FAQs on Microscope Parts and Functions with Labeled Diagram
1. What are the main parts of a microscope and their functions?
The main parts of a compound light microscope include optical, mechanical, and illuminating components that work together to magnify specimens.
- Eyepiece (ocular lens) – Magnifies the image (usually 10×).
- Objective lenses – Provide primary magnification (4×, 10×, 40×, 100×).
- Stage – Holds the slide in place.
- Coarse adjustment knob – Brings the specimen into general focus.
- Fine adjustment knob – Sharpens the image.
- Light source or mirror – Illuminates the specimen.
- Diaphragm – Regulates the amount of light.
2. What is the function of the objective lens in a microscope?
The objective lens is responsible for the primary magnification of the specimen in a microscope.
- Located close to the specimen.
- Available in different powers such as 4× (scanning), 10× (low power), 40× (high power), and 100× (oil immersion).
- Works with the eyepiece to produce total magnification.
3. What does the eyepiece do in a microscope?
The eyepiece, also called the ocular lens, further magnifies the image formed by the objective lens.
- Usually has a magnification of 10×.
- Positioned at the top of the body tube.
- Used to view the enlarged image of the specimen.
4. What is the function of the diaphragm in a microscope?
The diaphragm controls the amount of light that passes through the specimen.
- Located below the stage.
- Adjusts brightness and contrast.
- Improves clarity of the image.
5. What is the difference between coarse and fine adjustment knobs?
The coarse adjustment knob brings the specimen into general focus, while the fine adjustment knob sharpens the image for clarity.
- Coarse knob – Moves the stage up and down rapidly; used under low power.
- Fine knob – Makes small adjustments; used under high power.
6. What is the function of the stage in a microscope?
The stage is the flat platform that supports the microscope slide during observation.
- Contains stage clips to hold the slide.
- Has a central hole to allow light to pass through.
- May include mechanical controls for precise slide movement.
7. How does a compound light microscope work step by step?
A compound light microscope works by passing light through a specimen and magnifying the image using two lens systems.
- Light from the source passes through the diaphragm.
- Light travels through the specimen on the stage.
- The objective lens magnifies the image.
- The eyepiece further magnifies the image.
- The viewer sees an enlarged virtual image.
8. What is total magnification in a microscope?
Total magnification is the product of the objective lens power and the eyepiece power.
- Formula: Total magnification = Objective × Eyepiece.
- Example: 40× objective × 10× eyepiece = 400× total magnification.
9. What is the function of the light source in a microscope?
The light source provides illumination needed to view the specimen clearly.
- Located at the base of the microscope.
- May be a built-in bulb or a mirror.
- Works with the diaphragm to control brightness.
10. Why is the oil immersion lens used in a microscope?
The oil immersion lens (100×) is used to achieve very high magnification and improved resolution.
- Requires immersion oil placed between the slide and lens.
- Reduces light refraction.
- Provides clearer images of small structures like bacteria.


