


Maths Notes for Chapter 14 Practical Geometry Class 6 - FREE PDF Download
The methods for sketching geometrical forms are covered in this chapter.
To create shapes, we employ the following mathematical instruments:
A graduated ruler:
Along one edge, a ruler graduated in centimetres (and sometimes into inches along the other edge).
It is used to draw and measure the line segments.
The compass:
It is a pair of a pencil on one end and a pointer on the other.
It is used not to measure the equal lengths, but to mark them off.
Also, it is used to make circles and arcs.
The divider:
It is a pair of pointers.
It is used to compare the lengths.
Set-squares:
Set squares are the two triangular pieces, one with \[{{45}^{0}},{{45}^{0}}\] and \[{{90}^{0}}\] angles at the vertices and the other with \[{{30}^{0}},{{60}^{0}}\] and \[{{90}^{0}}\] angles.
It is used to draw the parallel and perpendicular lines.
The protractor:
It is used to measure the angles.
It is like a semi-circular scale with markings as angles.
The following constructions can be created with the ruler and compass:
A circle can be drawn only when the length of its radius is known.
A line segment can be drawn when its length is given.
Same procedure follows for the line segment.
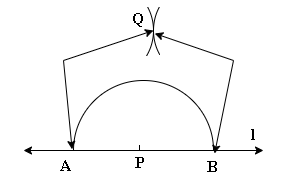
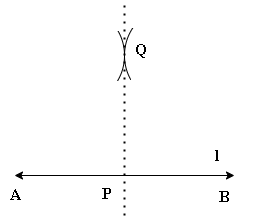
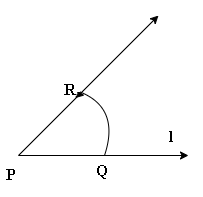
A perpendicular to a line can be drawn through a point
On the line
Not on the line.
The perpendicular bisector of a line segment of given length can be drawn.
An angle can be drawn for a given measure.
A copy of an angle.
The bisector of a given angle.
Some angles of special measures such as
\[{{90}^{0}}\]
\[{{45}^{0}}\]
\[{{60}^{0}}\]
\[{{30}^{0}}\]
\[{{120}^{0}}\]
\[{{135}^{0}}\]
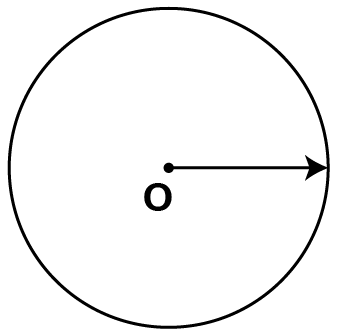
Construction of a circle when its radius is known:
Step \[1\]:
Open the compass for the required radius.
Step \[2\]:
Mark a point with a sharp pencil to denote where the centre of the circle has to be. Name it as \[O\].
Step \[3\]:
Place the pointer of the compass on \[O\].
Step \[4\]:
Now, turn the compass slowly either in clockwise or anticlockwise direction such that the pencil traces the circle of required radius. Care must be taken to complete the movement at one go.
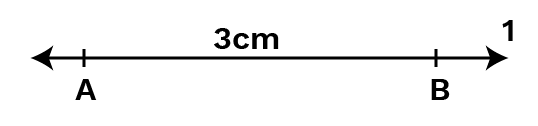
Construction of a line segment of a given length:
A better method would be to construct a line segment of a given length with a compass.
Draw a line for \[\text{3 cm}\] by using the following steps.
Step \[1\]:
Draw a line \[l\] and make a point \[A\] on line \[l\].
Step \[2\]:
Place the pointer of the compass at the zero mark of the ruler. Extend the other leg of the compass upto the 3 cm mark on the ruler.
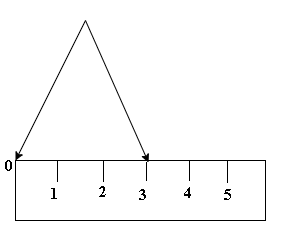
Step \[3\]:
Taking caution that the opening of the compass has not changed, place the pointer on \[A\] and swing an arc to cut \[l\] at \[B\].
Step \[4\]:
\[\overline{AB}\] is a line segment of required length.
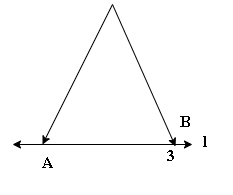
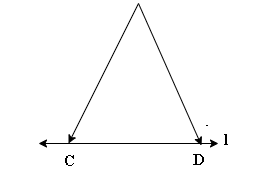
Constructing a Copy of a Given Line Segment:
A better technique would be to construct a line segment with a ruler and compass.
Following steps show how to draw \[\overline{AB}\].
Step \[1\]:
Given \[\overline{AB}\] whose length is not known.
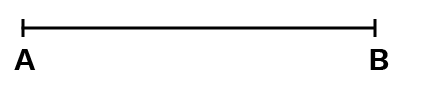
Step \[2\]:
Fix the compass pointer on \[A\] and the pencil end on \[B\].
The distance between the two open legs of the instrument now gives the length of \[\overline{AB}\].
Step \[3\]:
Draw any line \[l\].
Choose a point \[C\] on \[l\].
Without changing the compass setting, place the pointer on \[C\].
Step \[4\]:
Swing an arc that cuts \[l\] at a point, say, \[D\].
Now \[\overline{CD}\] is a copy of \[\overline{AB}\].
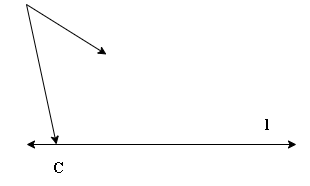
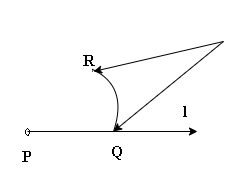
Method of Ruler and Compass:
Step \[1\]:
Given a point \[P\] on a line \[l\].

Step \[2\]:
With \[P\] as centre and a convenient radius, construct an arc intersecting the line \[l\] at two points \[A\] and \[B\].
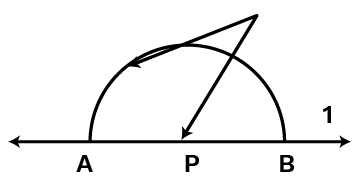
Step \[3\]:
With \[A\] and \[B\] as centres and a radius greater than \[AP\] construct two arcs, which cut each other at \[Q\].
Step \[4\]:
Join \[PQ\].
Then \[\overline{PQ}\] is perpendicular to \[l\].
We write \[\overline{PQ}\bot l\]
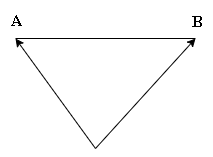
Constructing a Copy of an Angle of Unknown Measure:
We have to use only a straightedge and the compass for constructing an angle whose measure is unknown.
With the help of following steps, we can draw an unknown angle \[\angle A\]
Step \[1\]:
Draw a line \[l\] and choose a point \[P\] on it.

Step \[2\]:
Place the compass at \[A\] and draw an arc to cut the rays of \[\angle A\] at \[B\] and \[C\].
Step \[3\]:
Maintaining the same settings on the compass, draw an arc with \[P\] as centre, cutting \[l\] in \[Q\].

Step \[4\]:
Set the compass to the length \[BC\] with the same radius.
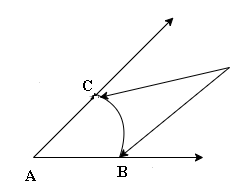
Step \[5\]:
Place the compass pointer at \[Q\] and draw the arc to cut the arc drawn earlier in \[R\].
Step \[6\]:
Join \[PR\]. This gives us \[\angle P\] . It has the same measure as \[\angle A\] .
This means \[\angle QPR\] has the same measure as \[\angle BAC\].
Chapter Summary - Practical Geometry
Class 6 Maths Chapter 14 - Practical Geometry delves into the fascinating world of shapes and constructions. It equips students with the skills to draw and understand geometric figures, fostering a hands-on approach to learning. The chapter covers essentials like constructing triangles, quadrilaterals, and circles. Through practical applications, students grasp the significance of geometry in real life. Engaging exercises and straightforward explanations make the journey enjoyable, ensuring a solid foundation in geometric concepts. Practical Geometry not only builds mathematical prowess but also instils a sense of discovery and creativity as students explore the geometric intricacies of the world around them.
10 Helpful Tips to Learn Class 6 Practical Geometry Chapter 14 with Ease
Embark on your Practical Geometry journey with these ten helpful tips designed for Class 6 students. From mastering basic shapes to applying geometry in art, these strategies promise an enjoyable and effective learning experience.
1. Start with Basics: Begin by understanding the fundamental geometric shapes like triangles, squares, and circles. This forms the basis for more complex constructions.
2. Use Visual Aids: Visualize each step of construction. Draw diagrams alongside the instructions to enhance your understanding.
3. Practice Regularly: Consistent practice is key. Regularly attempt different constructions to reinforce your skills and build confidence.
4. Understand Construction Steps: Break down each construction into simple steps. Ensure you comprehend the purpose of each step before moving on.
5. Explore Real-life Examples: Relate constructions to everyday objects or scenarios. For example, think about how triangles are used in building structures.
6. Seek Clarifications: Don't hesitate to ask your teacher or classmates for help if you find any step confusing. Clearing doubts early ensures a strong foundation.
7. Utilize Online Resources: Explore educational websites and videos to access additional explanations and demonstrations of geometric constructions.
8. Create Flashcards: Summarize key construction steps on flashcards. Quiz yourself regularly to reinforce your memory.
9. Group Study Sessions: Collaborate with classmates for group study sessions. Sharing ideas and methods can offer new perspectives and enhance learning.
10. Apply Geometry in Art: Connect practical geometry with artistic expressions. Use geometric shapes to create patterns or designs, making the learning experience enjoyable and creative.
What are the Benefits of Referring to Vedantu’s Revision Notes for Class 6 Maths Chapter 14 - Practical Geometry?
Unlock the world of Practical Geometry effortlessly with Vedantu’s Revision Notes for Class 6 Maths Chapter 14. From simplified key concepts to real-world applications, these notes streamline your understanding, making last-minute preparation efficient and boosting your confidence for exams.
Clear Summaries: Easily grasp key concepts with quick, clear summaries.
Simplified Topics: Navigate complex topics with simplified explanations.
Efficient Exam Prep: A handy tool for effective last-minute exam preparation.
Enhanced Retention: Improve memory retention of crucial information.
Exam Support: Get support with key points and preparation tips.
Time-Saving: Save time by accessing consolidated information.
Priority Topics: Focus on important topics and questions.
Real-World Examples: Connect theory to practice with practical examples.
Boosted Confidence: Gain confidence for exams with comprehensive preparation.
Conclusion
For an enhanced comprehension of this subject, NCERT - Class 6 Maths Chapter 14 - Practical Geometry, thoughtfully prepared by experienced educators at Vedantu, is your invaluable companion. These notes break down the complexities of Practical Geometry into easily digestible sections, helping you grasp new concepts and navigate through questions effortlessly and quickly at the last minute as well. By immersing yourself in these notes, you not only prepare for your studies more efficiently but also develop a profound understanding of the subject matter.

FAQs on CBSE Notes Class 6 Maths Chapter 14 - Practical Geometry - 2026-27
1. What is Practical Geometry, and why is it important for class 6 students?
Practical Geometry helps students apply geometric concepts to real-world problems, fostering a deeper understanding of shapes and measurements.
2. How can I use Vedantu’s Revision Notes to improve my understanding of Practical Geometry?
Vedantu’s notes provide simplified explanations, real-world examples, and key summaries, making it easier for you to grasp Practical Geometry concepts.
3. Are there specific tips for last-minute exam preparation in Practical Geometry?
Yes, the notes offer efficient tools and tips for last-minute exam preparation, ensuring you cover essential topics and boost your confidence.
4. Can revision notes by Vedantu help me solve practical problems related to geometry?
Absolutely! The notes prioritise practical examples, allowing you to apply geometric concepts to real-world scenarios and enhance your problem-solving skills.
5. How do Vedantu’s Revision Notes prioritise important topics in Practical Geometry?
The notes focus on key points and questions, helping you prioritise your study efforts and ensuring you're well-prepared for exams.