


How to Construct Angles Using Compass and Protractor Step by Step
Angles are everywhere in geometry problems. This article will teach you how to construct the angles you need for many different types of geometric problems. construction of angles is everywhere in geometry problems. this article will teach you how to construct the angles you need for many different types of geometric
Construction of Vertical Angles
A vertical line is a line that is perpendicular (At a right angle) to the horizontal level ground. If you have two lines on the same plane intersecting, you draw a diagonal of one line to the other. If they intersect perpendicularly, the lines form vertical angles on each side of the points of intersection.
Construction of Supplementary Angles
Constructing the angle of a line going through 90 degrees is easy if you know how to construct perpendicular lines. If two lines intersect creating a "T" shape, you draw two lines from the top of one line to the bottom of the other. The angles formed are supplementary.
Construction - Step by Step Representation
Construction of an angle can be broken down into a couple of steps:
1) Draw a ray, and
2) draw a line perpendicular to that ray. Then, set your compass point at the vertex of the angle you want to draw and extend its legs so they cross one another.
Use those intersection points as the centre of your circle, and construct your angle. It can be helpful to use a ruler for this, but if you do it correctly the compass should already be in the right place. With the help of the construction of any angle, you will be able to solve problems in geometry.
Constructing 30, 60, 90, 120 Degree Angles
One of the most important aspects of geometry is constructing angles. Understanding the basics of this is very important and thus one must try and learn this properly.
1. Constructing a 60 - Degree Angle:
In an equilateral triangle, all the angles are equal and they are equal to 60° in size. Thus, to draw 60°, we need to construct an equilateral triangle.
Step 1: Draw the arm PQ.
Step 2: Then place the point of the compass at P and draw an arc such that it passes through Q.
Step 3: Now place the point of the compass at Q and draw an arc such that it passes through P. The arc drawn at this step should cut the arc drawn in the above step at R.
Step 4: Now joining P to R. This angle measures 60° as the triangle PQR formed is equilateral.
2. Constructing a 30° Angle:
We know that 30° is half of 60°. So we can apply this knowledge to construct a 30° angle.
Step 1: To construct an angle of 30°, we first need to construct an angle of 60° and then further bisect it.
Step 2: Draw the arm PQ
Step 3: Then place the point of the compass and then draw an arc that passes through Q.
Step 4: Place the point of the compass at Q and then draw the arc which cuts the arc drawn at the above step at another point R.
Step 5: With the compass at Q, draw another arc near the point T as shown in the figure.
Step 6: Now with the point of the compass at R, draw another arc to cut the arc drawn at step 5 at T.
Step 7: Now join the point T to the point P. Now the angle QPT is 30°
3. Constructing a 120° Angle:
120° angle can be constructed using the logic that 60° + 120° = 180°. Thus, we can understand that to construct 120° we can construct 60° angle and then further extend one of its arms as shown below in the figure.
4. Constructing a 90° Angle:
To construct a 90° angle, there are two ways. The first one is by bisecting a straight angle and the other step is given below.
Step 1: First draw the arm PA.
Step 2: Now place the point of the compass at P and then draw an arc that cuts the arm at Q.
Step 3: Now place the point of the compass at Q and draw an arc that has a radius similar to the radius of PQ. This arc must cut the arc which is drawn in the above step at a point R.
Step 4: Now place the point of the compass at R and draw an arc of the radius which is similar to the radius of PQ to cut the arc which is drawn at step 2 at another point S.
Step 5: With the point of the compass at R, draw another arc of radius the same as the radius of PQ near the point T as shown in the figure below.
Step 6: With the point of the compass at S, draw an arc of radius similar to the radius of arc PQ and cut the arc which was drawn at step 5 at the point T.
Step 7: Join T to P using a scale. The angle APT formed measures 90°.
Constructing Angle Bisectors
By making angle bisectors for an angle, one can divide the angle precisely in half. A bisector divides an angle into two equally sized parts. Angle bisector construction results in a line that provides two congruent angles for a given angle. For instance, when an angle bisector is built for a $75^\circ$ angle, it divides the angle into two identical angles, each of which is $35^\circ$. Angle bisectors can be created for acute, obtuse, and right angles as well.
Compass Use to Construct an Angle Bisector
A line that divides an angle into two equal halves is known as an angle bisector. If the angle's measurement is known, we just need a protractor, a ruler, a pencil, and a math compass to construct an angle bisector geometrically. An angle bisector can divide any angle into two equal parts. Let's think about the angle AOB displayed below.
Keep in mind that the angle's magnitude is not specified here. Therefore, we can construct the angle bisector without using a protractor.
To create an angle bisector, follow the procedure given below:
Draw two arcs with O as the centre, spanning any radius width, so they intersect the rays OA and OB at places C and D, respectively. Since these are the radii of the same circle, OC = OD.
Draw two arcs with centres at C and D so that they connect at a place called E while maintaining the same distance between the compass's legs (in the image).
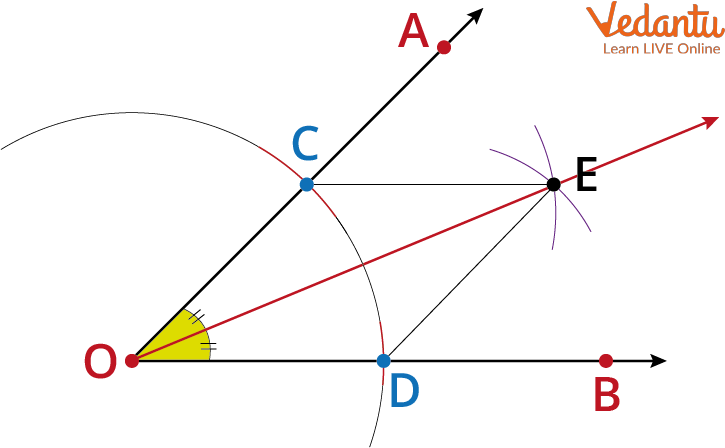
Angle Bisector
Because the two arcs drawn in this phase have the same radius, take note that CE = DE.
Join the Ray OE. This is the necessary angle bisector of angle AOD.
Construction of Angles
Let's practise making angles with a ruler and compass. In the methods below, we will first create a $90^\circ$ angle and then create an angle bisector to divide the $90^\circ$ into two equal parts, giving us a $45^\circ$ angle.
Sketch an AB ray.
Draw a semicircular arc that touches the line segment AB and label it Q using A as the centre and any width as the radius.
Draw another arc with Q as its centre and designate this point as D, but leave the radius unchanged.
Carry out the previous step with D as the centre and identify the drawn arc as E.
Now, create arcs that meet each other at a point and name it F, using the same radius and the centres E and D.
Finally, connect points A and F. This line, also known as the perpendicular line, forms a $90^\circ$ angle with the line segment AB.
Write P at the semicircular arc's intersection with the AF line.
Now, using the same radius as in step 2, draw two arcs with the centres P and Q. Identify R as the intersection of these arcs. Connect points A and R. Now, RAB and FAR are both $45^\circ$.
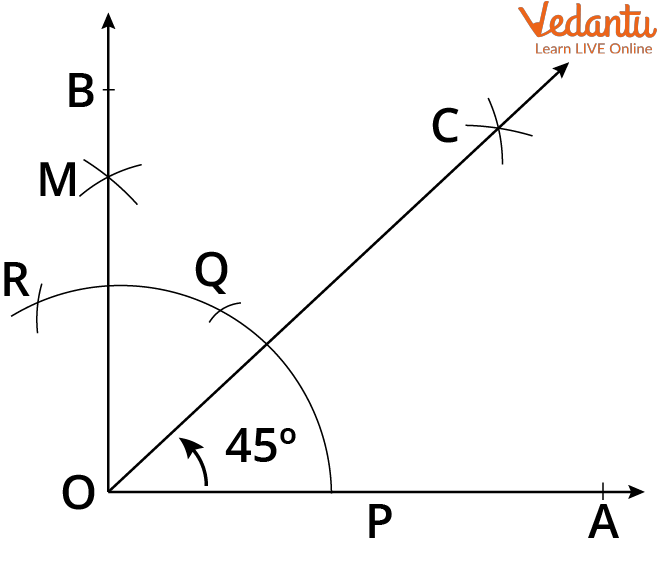
Angle $45^\circ$
How to Construct an Angle of 75 Degrees?
The following are the steps to construct $75^\circ$ angle.
Sketch an AB ray. Draw an arc with any radius that passes through A and AB at C.
We draw an arc with C as the centre and the same radius that cuts the first arc at D. We then create an arc with D as the centre and the same radius that cuts the first arc at E.
We draw two arcs with the same radius and centres at E and D intersecting at F. Draw a line AF. Line AF and line segment AB intersect at a $90^\circ$ angle.
Mark the line AF's intersection with the semicircular arc as G in step 4. Draw two arcs again, cutting each other at H, using G and D as the centres. We now join AH. HAB is $75^\circ$ angle.
The following diagram illustrates how to draw 75-degree angle with a compass.
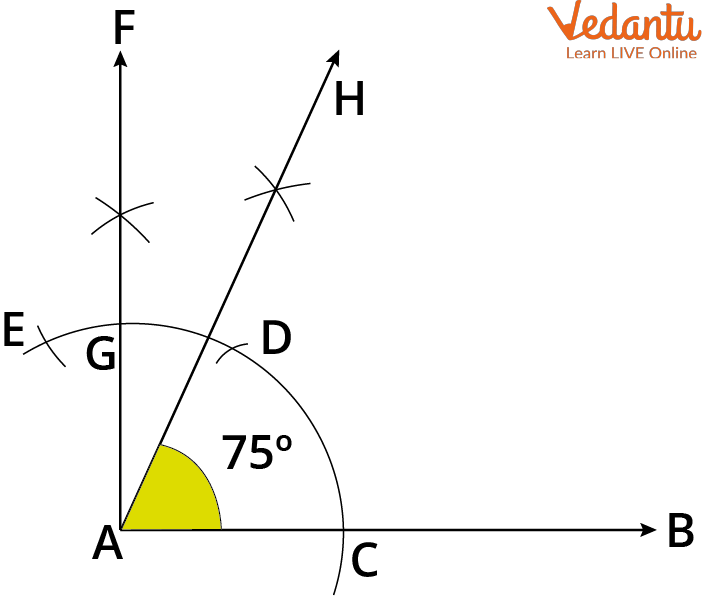
75 Degree Angle
Example Problem
1. Use a ruler and compass and construct a triangle ABC. in the triangle, AB = 5 cm, angle BAC = 60° and AC = 4.5 cm. Also, measure the angle of angle ABC and angle ACB and calculate the angle sum of ABC.
Solution
Step 1: First draw the line AB which is 6m long.
Step 2: Now use a compass to construct a 60° angle at point A.
Step 3: Use the ruler to find C such that AC is 4.5 cm long.
Step 4: Now, join B to C.
The triangle ABC formed is the required triangle.
Now, for the next part, we can use a protractor to find the rest of the angles.
Thus we can conclude that,
Angle ABC = 55°
Angle ACB = 65°
Thus, the angle sum of the triangle ABC = 60° + 55° + 65° = 180°
Conclusion
This article has shown you how to construct many different angles. Angle construction is what you need to complete many geometry problems. This article provides the steps needed to construct any angle you might find in geometry. construction is a very useful tool in mathematics. It is what you need to complete many geometry problems.
This article provides the steps needed to construct any angle you might find in geometry. Construction is a very useful tool in mathematics. With the help of the construction of angles, students can solve any question related to the construction of angles and score very good marks in examinations.
FAQs on Construction of Angles in Geometry
1. What is construction of angles in geometry?
The construction of angles in geometry is the process of drawing angles of a specific measure using only a compass and ruler (without a protractor). It is a fundamental topic in practical geometry and includes constructing angles like 30°, 45°, 60°, 90°, and their combinations. These constructions are based on geometric properties of circles, arcs, and triangles rather than measurement.
2. How do you construct a 60° angle using a compass?
A 60° angle is constructed by forming an equilateral triangle using a compass and ruler. Follow these steps:
- Draw a ray AB.
- With A as center, draw an arc cutting AB at C.
- With C as center and same radius, draw another arc intersecting the first arc at D.
- Join A to D.
3. How do you construct a 90° angle without a protractor?
A 90° angle is constructed by drawing a perpendicular to a given line using a compass. Steps:
- Draw a line and mark a point A on it.
- With A as center, draw an arc cutting the line at two points B and C.
- With B and C as centers and equal radius, draw arcs intersecting at D.
- Join A to D.
4. How do you construct a 45° angle?
A 45° angle is constructed by bisecting a 90° angle. Steps:
- First construct a 90° angle.
- With the vertex as center, draw an arc cutting both arms.
- From the two cut points, draw arcs intersecting inside the angle.
- Join the vertex to the intersection point.
5. How do you bisect a given angle?
To bisect an angle means to divide it into two equal parts using a compass and ruler. Steps:
- With the vertex as center, draw an arc cutting both arms at points P and Q.
- With P and Q as centers and equal radius, draw arcs intersecting at R.
- Join the vertex to R.
6. How do you construct a 30° angle?
A 30° angle is constructed by bisecting a 60° angle. Steps:
- Construct a 60° angle.
- Use the angle bisector method to divide it into two equal parts.
7. How do you construct an angle of 120°?
A 120° angle is constructed by forming two 60° angles at a point. Steps:
- Construct a 60° angle at point A.
- Extend one arm of the 60° angle.
- Construct another 60° adjacent to it.
8. What instruments are used for construction of angles?
The main instruments used in construction of angles are a compass and a ruler. These tools help in:
- Drawing arcs and circles (compass).
- Drawing straight lines and joining points (ruler).
9. How do you construct an angle of 75°?
A 75° angle is constructed by combining 45° and 30° angles. Steps:
- Construct a 60° angle.
- Bisect it to get 30°.
- Construct a 90° angle and bisect it to get 45°.
- Add 45° and 30° at the same vertex.
10. Why is construction of angles important in geometry?
The construction of angles is important because it helps students understand geometric properties and develop accuracy in drawing figures. It is used in:
- Constructing triangles and polygons.
- Drawing perpendicular and parallel lines.
- Solving practical geometry problems.