


Using ruler and compasses only, draw a right angle.
Answer
554.7k+ views
Hint: To start with, we need to draw a reference line AB, with respect to which the required right angle will be drawn. Then, choosing any of the two points, say A, as centre and opening the compass to a suitable radius, we have to draw an arc cutting AB at C. With the same radius and C as centre, we will draw an arc cutting the original arc at D. Then, with the same radius and D as centre, we will draw an arc cutting the original arc at E. Then consecutively choosing D and E as centers and the same radius, we will draw two arcs cutting each other at F. Finally, we will join the points A and F so that the angle FAB will be the required right angle.
Complete step by step solution:
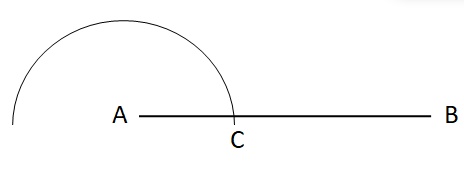
Step I: Draw a base line segment AB

Step II: Choosing A as centre and a convenient radius, draw an arc which cuts AB at C.
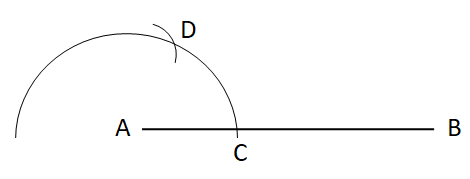
Step III: Now, taking C as centre and the same radius, draw an arc cutting the original arc at point D.
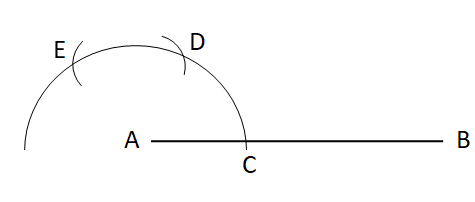
Step IV: Now, taking D as centre and with the same radius, draw an arc cutting the original arc at E.
Step V: Taking D as centre and the same radius, draw an arc.
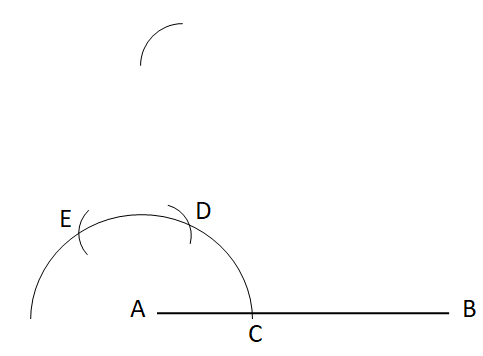
Step VI: Similarly, taking E as centre and the same radius, draw an arc cutting the previous arc at F.
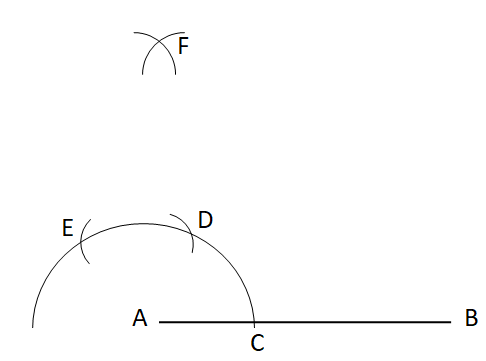
Step VII: Finally, join the points A and F.
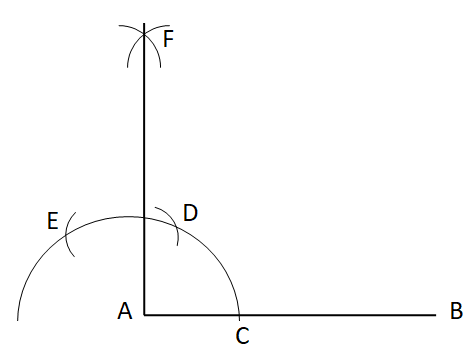
Hence, the angle FAB is the required right angle.
Note: As we can notice in the above solution, the radius is not changed in any of the steps. Therefore, we must be careful while choosing the radius and it must be less than the length of AB. Also, the arcs must be drawn very lightly so as to accurately obtain the final right angle.
Complete step by step solution:
Step I: Draw a base line segment AB
Step II: Choosing A as centre and a convenient radius, draw an arc which cuts AB at C.
Step III: Now, taking C as centre and the same radius, draw an arc cutting the original arc at point D.
Step IV: Now, taking D as centre and with the same radius, draw an arc cutting the original arc at E.
Step V: Taking D as centre and the same radius, draw an arc.
Step VI: Similarly, taking E as centre and the same radius, draw an arc cutting the previous arc at F.
Step VII: Finally, join the points A and F.
Hence, the angle FAB is the required right angle.
Note: As we can notice in the above solution, the radius is not changed in any of the steps. Therefore, we must be careful while choosing the radius and it must be less than the length of AB. Also, the arcs must be drawn very lightly so as to accurately obtain the final right angle.

Recently Updated Pages
Basicity of sulphurous acid and sulphuric acid are
Master Class 11 Business Studies: Engaging Questions & Answers for Success
Master Class 11 Computer Science: Engaging Questions & Answers for Success
Master Class 11 Economics: Engaging Questions & Answers for Success
Master Class 12 English: Engaging Questions & Answers for Success
Master Class 12 Social Science: Engaging Questions & Answers for Success
Trending doubts
What are gulf countries and why they are called Gulf class 8 social science CBSE
Name the states through which the Tropic of Cancer class 8 social science CBSE
What is BLO What is the full form of BLO class 8 social science CBSE
What are the 12 elements of nature class 8 chemistry CBSE
In Indian rupees 1 trillion is equal to how many c class 8 maths CBSE
Who created the image of Bharat Mata for the first class 8 social science CBSE