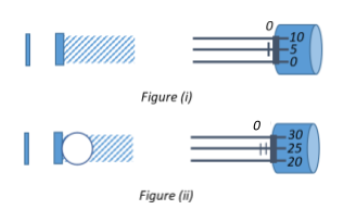
In a screw gauge, the zero of the main scale coincides with the fifth division of circular scale in figure (i). The circular divisions of the screw gauge are 50. It moves $0.5\;mm$ on the main scale in one rotation. The diameter of the ball in figure (ii) is:

A). $2.25\;mm$
B). $2.20\;mm$
C). $1.20\;mm$
D). $1.25\;mm$

Answer
558.9k+ views
Hint: We know that the pitch of the gauge is the distance by which it moves on the main scale in a single rotation. Use this to determine the least count of the circular scale, given that it has 50 divisions. From Figure (i) determine the zero error of the gauge, keeping in mind that the zero on the main scale is above the zero on the circular scale. Then deduce the main scale reading and the circular scale reading from Figure (ii) and use the previously found parameters to arrive at an appropriate diameter of the ball.
Formula Used:
Diameter: $D = MSR + (LC \times (CSR - Z))$
Complete step-by-step solution:
We know that a screw gauge is an instrument that is used to accurately measure the diameter or thickness of spherical and cylindrical objects. The object to be measured is placed in between a fixed structure called anvil and is screwed into its place by a movable spindle. The spindle moves in response to the rotation of the screw of the circular scale. The thimble is usually rotated by hand, which in turn rotates the circular scale and calibrates it to an appropriate reading along with the main scale.
Before we begin to evaluate the problem given to us, let us understand the meaning of a few terms associated with measurements taken using a screw gauge.
The pitch of the screw gauge is defined as the distance moved by the spindle per rotation of the thimble, i.e.,
Pitch $P = \dfrac{\text{Distance moved by gauge}}{\text{Number of rotations}}$
Given that the gauge moves $0.5\;mm$ on main scale in one rotation of the screw,
Pitch $P = \dfrac{0.5}{1} = 0.5\;mm$
The least count of the screw gauge is defined as the distance moved by the spindle when turned through one division of the main scale, i.e.,
Least Count $LC = \dfrac{\text{Pitch}}{\text{Number of divisions on circular scale}}$
We are given that the number of divisions on the circular scale is 50.
Therefore, least count $LC = \dfrac{0.5}{50} = 0.01\;mm$
The zero error of a screw gauge is defined as the error when the zero line on the circular scale does not coincide with the zero on the main scale when the screw of the circular scale is fully tightened.
From Figure (i), we see that the zero of the main scale is above the zero of the circular scale and coincides with the 5th division of the circular scale.
Therefore, the zero error will be $Z = 5$
Let us now look at Figure (ii).
We see that the main scale reading$\;MSR$ is at $1\;mm$,
And the circular scale reading$\;CSR$ is at$\;25$
Therefore, the diameter of an object placed in between the spindle and the anvil can be given by:
$D = MSR + (LC \times (CSR - Z))$
$\Rightarrow D = 1 + (0.01 \times (25 -5)) = 1 + (0.01 \times 20) = 1 + 0.20 = 1.20\;mm$
Therefore, the correct choice would be C. $1.20\;mm$
Note: It is important to understand the sign convention behind zero error. The screw gauge is said to have a negative zero error if the zero of the main scale is below the zero of the circular scale. This is to account for the ahead-ness of the circular scale readings, which will be greater than the true actual value.
The screw gauge is said to have a positive zero error if the zero of the main scale is above the zero of the circular scale. This is done to account for the lagging of the circular scale readings, which will be lesser than the true value.
Thus, the zero error is subtracted or added from the circular scale readings as a means of calibrating the end result to an accuracy.
Recently Updated Pages
Master Class 11 Social Science: Engaging Questions & Answers for Success

Master Class 11 Physics: Engaging Questions & Answers for Success

Master Class 11 Maths: Engaging Questions & Answers for Success

Master Class 11 Economics: Engaging Questions & Answers for Success

Master Class 11 Computer Science: Engaging Questions & Answers for Success

Master Class 11 Chemistry: Engaging Questions & Answers for Success

Trending doubts
One Metric ton is equal to kg A 10000 B 1000 C 100 class 11 physics CBSE

There are 720 permutations of the digits 1 2 3 4 5 class 11 maths CBSE

1 Quintal is equal to a 110 kg b 10 kg c 100kg d 1000 class 11 physics CBSE

State and prove Bernoullis theorem class 11 physics CBSE

Difference Between Prokaryotic Cells and Eukaryotic Cells

Which among the following are examples of coming together class 11 social science CBSE


