Explain the experiment of vernier calipers.
Answer
549k+ views
Hint: To measure something of millimeter’s order using a scale or ruler stresses our eyes and reduces accuracy. Vernier caliper is a device that is used to make very accurate measurements of the order of millimeters.
Complete step by step solution:
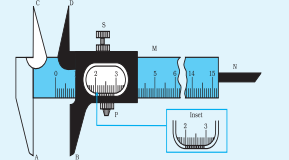
There are four parts of Vernier caliper
Main scale
Venire scale
Inner measuring jaws
Depth measuring prong
The magnitude difference of one main scale division (M.S.D.) and one Vernier scale division (V.S.D.) is called an instrument’s Least count. Least count of Vernier caliper is calculated as given below.
Least count =$\dfrac{{\text{One Main Scale Division}}}{{\text{total vernier scale division}}}$
$ \Rightarrow \dfrac{{1mm}}{{10}} = 0.1mm = 0.01cm$

The diagram shows the Vernier caliper. In Vernier calipers, we have two external jaws placed downwards and two internal jaws placed upwards. The bigger one is the external jaws that is used for tightening the object. The internal jaws open for inserting the object. Both the jaws work by sliding a scale.
When the sliding scale’s zero matches up the main scale reading that is when we should note the readings.
The match of the main scale readings with the Vernier scale gives the value of the Vernier scale reading.
Steps to measure the diameter of an object are the following.
The object whose diameter is to be measured is kept in between the jaws of the instrument and the reading on the main scale and vernier scale is noted.
The total reading of the scale is given as follows.
$\text{Total scale reading = main scale reading + Vernier scale reading.}$
Additional information:
Uses of Vernier calipers are the following.
The Diameter of a small spherical /cylindrical body is known and can be determined by the Vernier calipers.
To measure the dimensions of a given regular body of known mass and hence to determine its density
To measure the internal diameter and depth of a given cylindrical object like beaker /glass /calorimeter and hence to calculate its volume.
Note:
Make sure that there is no manufacturing error in the device by checking the zero of the main scale should coincide with the zero of the Vernier scales. If it is not so, the instrument is said to possess zero error. Zero error will either be positive or negative.
Complete step by step solution:
There are four parts of Vernier caliper
Main scale
Venire scale
Inner measuring jaws
Depth measuring prong
The magnitude difference of one main scale division (M.S.D.) and one Vernier scale division (V.S.D.) is called an instrument’s Least count. Least count of Vernier caliper is calculated as given below.
Least count =$\dfrac{{\text{One Main Scale Division}}}{{\text{total vernier scale division}}}$
$ \Rightarrow \dfrac{{1mm}}{{10}} = 0.1mm = 0.01cm$

The diagram shows the Vernier caliper. In Vernier calipers, we have two external jaws placed downwards and two internal jaws placed upwards. The bigger one is the external jaws that is used for tightening the object. The internal jaws open for inserting the object. Both the jaws work by sliding a scale.
When the sliding scale’s zero matches up the main scale reading that is when we should note the readings.
The match of the main scale readings with the Vernier scale gives the value of the Vernier scale reading.
Steps to measure the diameter of an object are the following.
The object whose diameter is to be measured is kept in between the jaws of the instrument and the reading on the main scale and vernier scale is noted.
The total reading of the scale is given as follows.
$\text{Total scale reading = main scale reading + Vernier scale reading.}$
Additional information:
Uses of Vernier calipers are the following.
The Diameter of a small spherical /cylindrical body is known and can be determined by the Vernier calipers.
To measure the dimensions of a given regular body of known mass and hence to determine its density
To measure the internal diameter and depth of a given cylindrical object like beaker /glass /calorimeter and hence to calculate its volume.
Note:
Make sure that there is no manufacturing error in the device by checking the zero of the main scale should coincide with the zero of the Vernier scales. If it is not so, the instrument is said to possess zero error. Zero error will either be positive or negative.
Recently Updated Pages
Master Class 11 Social Science: Engaging Questions & Answers for Success

Master Class 11 English: Engaging Questions & Answers for Success

Master Class 11 Maths: Engaging Questions & Answers for Success

Master Class 11 Chemistry: Engaging Questions & Answers for Success

Master Class 11 Biology: Engaging Questions & Answers for Success

Master Class 11 Physics: Engaging Questions & Answers for Success

Trending doubts
One Metric ton is equal to kg A 10000 B 1000 C 100 class 11 physics CBSE

Difference Between Prokaryotic Cells and Eukaryotic Cells

Draw a diagram of a plant cell and label at least eight class 11 biology CBSE

Two of the body parts which do not appear in MRI are class 11 biology CBSE

Which gas is abundant in air class 11 chemistry CBSE

10 examples of friction in our daily life


