


Construct the parallel line with steps.
Answer
587.7k+ views
Hint: In this question, we need to construct two parallel lines. For this, we will first draw any line. Now for making a line parallel to the drawn line, we will draw a line from a point X on AB to any point P. Then we will make an angle taking some radius from X cutting the line XP and AB at NM. Now using the same radius, we will draw an angle at P which cuts XP at Q. From this, we will cut the previous angle at point E. Joining E and P will give us our required parallel lines.
Complete step-by-step answer:
Let us draw two parallel lines using the following steps of construction.
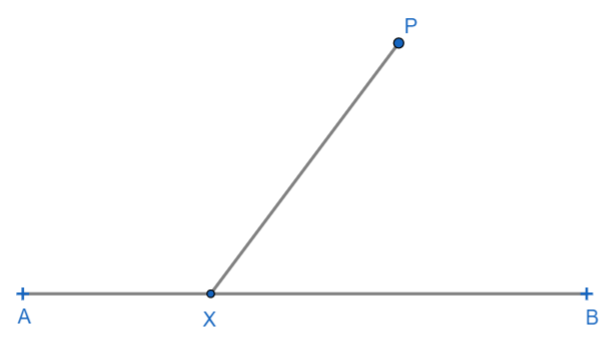
1: Let us first draw any random line along which we will make a parallel line. Let AB be this random line. Then let us take any point X on the line AB and any point P above the line at some distance. Join these two points, we get line XP.
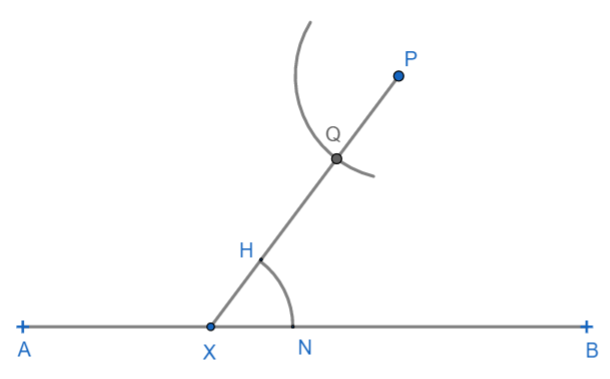
2: Now open the compass with some radius and draw an arc with X as center cutting the line XP at M and the line AB at N. Then using the same radius, draw the arc taking P as center. This arc will cut XP at Q.
3: Now taking radius and taking center at Q, draw an arc cutting the previous arc by P at some point E. Join P and E and extend line till C and D, we get a line CD.
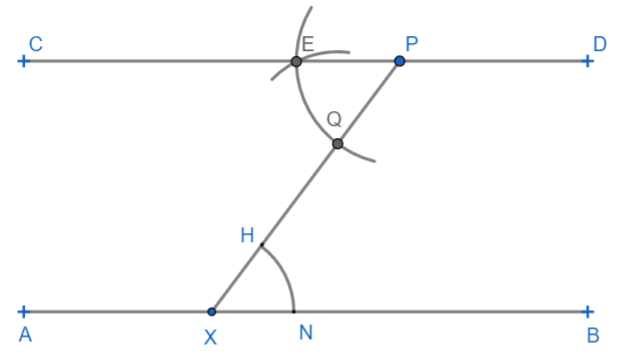
Hence, the formed line CD is line parallel to AB. Thus AB and CD are required parallel lines.
Note: Students should note that here, we have used the concept of alternate interior angles (which are equal in parallel lines) to draw these parallel lines. Make sure that radius remains the same for all arcs from X, P and Q. Make sure that, compass is tight and the pencil is sharpened.
Complete step-by-step answer:
Let us draw two parallel lines using the following steps of construction.
1: Let us first draw any random line along which we will make a parallel line. Let AB be this random line. Then let us take any point X on the line AB and any point P above the line at some distance. Join these two points, we get line XP.
2: Now open the compass with some radius and draw an arc with X as center cutting the line XP at M and the line AB at N. Then using the same radius, draw the arc taking P as center. This arc will cut XP at Q.
3: Now taking radius and taking center at Q, draw an arc cutting the previous arc by P at some point E. Join P and E and extend line till C and D, we get a line CD.
Hence, the formed line CD is line parallel to AB. Thus AB and CD are required parallel lines.
Note: Students should note that here, we have used the concept of alternate interior angles (which are equal in parallel lines) to draw these parallel lines. Make sure that radius remains the same for all arcs from X, P and Q. Make sure that, compass is tight and the pencil is sharpened.

Recently Updated Pages
Master Class 8 Social Science: Engaging Questions & Answers for Success
Master Class 8 Science: Engaging Questions & Answers for Success
Master Class 8 Maths: Engaging Questions & Answers for Success
Class 8 Question and Answer - Your Ultimate Solutions Guide
Master Class 9 Social Science: Engaging Questions & Answers for Success
Master Class 9 Science: Engaging Questions & Answers for Success
Trending doubts
What are gulf countries and why they are called Gulf class 8 social science CBSE
What is BLO What is the full form of BLO class 8 social science CBSE
Give full form of LPG and CNG class 8 chemistry CBSE
Citizens of India can vote at the age of A 18 years class 8 social science CBSE
Advantages and disadvantages of science
Full form of STD, ISD and PCO