

As Christmas day approaches, the prices of Christmas party decorative items are at their peak. But what’s 25th December without a bright home, colourful lights and a tree adorned with cute ornaments and bells hanging on the walls?
We have brought you super-fun & easy Christmas origami ideas that kids can easily make and decorate their homes with a Christmas theme.
Origami is the Japanese art of paper folding. Making Christmas Origami projects is such an amazing & wonderful activity for kids. It brings fun, joy & learning at the same time, not only for kids but also for parents to celebrate the day.
Moreover, the best thing about these Christmas origami is that they are cheap and give a tempting & adorable look to your Christmas party. All you need is paper & scissors. So, let’s find out how you can make an origami Christmas tree.
Also Read : Essay on Christmas
Origami Christmas Tree Instructions
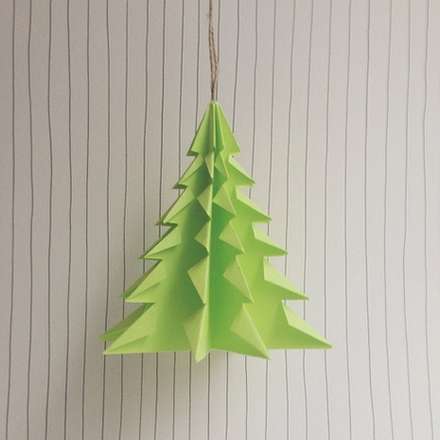
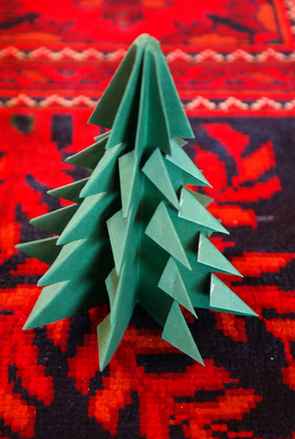
If you are wondering how to make an origami Christmas tree, then you are in the right place. These Christmas origami trees are so simple to make and look super charming. So, instead of spending more money on expensive last-minute Christmas decoration ideas, then why not try making these cute little paper Christmas trees? Let’s have a look at our step-by-step guide to making Christmas trees out of paper:
Materials Required for Christmas Tree Paper Craft:
White or coloured paper, depending on how you want your project to look
Scissors
Hole puncher
Paper straw
Glue
Follow These Step-By-Step Instructions for Christmas Tree Paper Craft
Print the shape of a tree on green paper or any paper that you have selected
Once your template is ready, cut the paper in a tree shape accordingly.
Take the cutout tree part and keep folding it from one end to the other. You must keep the size of the folds about half an inch wide. You can keep them wider according to your wish
Keep the folds crisp. You can set a craft stick in the middle of the folds for this.
Once the folding is done, take the hole puncher and put a hole in the middle, going through all folds.
Take the paper straw and push it through the hole. Now carefully stretch the paper along the paper straw.
Glue the yellow stars on the top of the tree. Your easy origami Christmas decorations are ready to go.
Christmas Card Design for Kids
You can make an origami Christmas card in a variety of colours depending on your wish. It will look wonderful. Christmas cards don’t have to be expensive. You can make amazingly beautiful cards with just some paper sheets. So, get your Christmas design paper ready & let’s make some lovely little Christmas tree cards.
Look at this simple Christmas card idea to apply to your Christmas party.
What You Need for Christmas Card Design:
A paper sheet
Scrap paper cuttings (For Green colour tree leaves)
Brown paper for the tree
Contrasting paper for background & Stars
Glue & scissors
Step-By-Step Instructions for Christmas Card Design
Take a sheet of paper (A4 size) and fold it in half
Cut the paper in half to get two rectangles
Fold each of those rectangles in half to make a card
To give a unique background for your card, take a contrasting coloured paper such as Pink. Cut it a bit smaller than the original card size so that the edges will show.
Take the brown paper & cut a small rectangle that looks like a tree stump
Glue it at the bottom of the coloured paper.
Now, cut green paper strips enough to make a tree.
Apply glue along those strips and place them on the card one by one in a triangle shape. Your origami Christmas tree card is ready.
Origami Snowman Card Design
To surprise your family & friends a little more, how about making them invite through a Christmas snowman for your Christmas party? Follow these step-by-step instructions to make a Christmas snowman card. Take a look:
What You Need for Origami Snowman Card Design:
A sheet of letter-sized or A4 sized
Scrap paper in a variety of colours or you can also use ribbons
Orange paper or orange sketch pen
Black marker
Scissors & glue
Step-By-Step Instructions for Origami Snowman Card Design
For larger cards, fold an A4-sized or letter-sized paper in half. For smaller cards, you can fold a sheet of paper in half and cut them into two halves. Now, fold each of those halves to make a card.
Cut out a strip of colourful paper.
Glue the strip to the card in the middle.
Cut out the excess and glue it below the first to give a scarf look.
Take the black marker and draw eyes, mouth & buttons.
Cut an orange paper into a carrot shape to use as a nose. You can also draw it with an orange marker.
Glue the nose above the mouth, and your snowman Christmas cards are ready.
How to Make a Paper Stocking?
Do you want to create the Santa boots out of paper? Here, we are showing a simple way to make Christmas stocking paper designs. Make a cut & adorable mini origami stocking for hanging on the tree or walls for good luck. These colourful paper stockings are a fun & simple holiday craft for kids. Here is how you can make it:
Take a square piece of origami-coloured paper and fold down a small strip starting from the top.
Turn the paper over, fold it half, and then unfold it.
Now fold both end sides to the centre crease so that the coloured parts are not shown.
Turn the paper over to the coloured side and fold it in half again from the centre crease by folding the right side over to the left.
Now take about 1/3rd of the top and fold it down, then unfold
Now take the bottom part and fold about 2/3rd to the left to give a diagonal crease, then unfold it.
Open up the bottom flap and fold the flap to the left.
Take the left side and fold it over to the right.
Now take the top & fold it down towards the flap.
Bend down the end part of the toe stocking diagonally, then unfold.
Now extend the front and push in the toe
Bend up the bottom of the toe, then unfold.
Now push that small part inwards, and your Christmas stocking is ready.
Conclusion
So, we just saw how fun & creative it is to make these easy origami Christmas decorations by kids. Take the ideas and try them with your kids this Christmas. It is a mind-relaxing & creative learning process for kids to break from their routines & celebrate festivals in unique ways. Follow these step-by-step origami instructions and make the cutest stuff with paper.
FAQs on How to Make Christmas Decorations Out of Paper Step By Step
1. What can I make out of paper for Christmas?
Ans: There is a variety of easy Christmas origami that you can make for your papercraft projects, such as Christmas trees, origami Christmas cards, snowman cards, Christmas stocking paper, Santa Claus, etc. Take the above-mentioned ideas and indulge in the activities with your kids.
2. Which is the easiest origami I can make?
Ans: The simple origami you can make as a beginner includes Crane, Envelope Wallet, Tissue Holder, Fan, Boat, Paper Plane, etc.
3. How is origami good for your brain?
Ans: Making origami requires proper attention and hand-eye coordination that helps develop fine motor skills & supports mental focus in kids.


