

DIY Geode Making Steps To Follow
Introduction
Geodes look so dreamy when they are opened. It seems like a piece of heaven protected inside a hard shell or a rock. The mesmerising colours appear due to the formation of crystals of different salts. It can be found naturally but hard to get one. Here is how you can make a geode at home as a science project.
In this article, we will discuss the steps to make your own geode at home using kitchen supplies. It will look close enough to natural geodes and people will surely recognise it. Before learning the steps, let us learn what geodes are and what are they made of.
What is a Geode?
A geode is a natural rock that has mesmerising crystals of salts hidden inside it. They are either spherical or sub-spherical in shape. A geode has an internal cavity where the marvellous salt crystals have been deposited for millions of years. These crystals are quite fragile whereas the outer shell is tough like rocks.
Due to the tougher shell, geodes have survived the test of time for millions of years. It is resistant to weather factors and even bedrock. When cracked open, a beautiful world inside made of minerals and crystals is revealed. The enthusiasts like to crack open geodes and find out how beautiful the internal part is.
It is easier to identify natural geode rocks among common rocks. The surface is generally bumpy in nature. When shaken, a geode can produce sounds due to the loose material present inside the hollow space. These rocks will also be lighter than their appearance.
How to Make a Geode At Home?
Here is what you will need to make a geode at home.
Eggs
Craft glue
Egg dye
A cup
A bowl
Food colouring
Epsom salt
Toothpicks
Here is the list of steps you have been waiting for to make your own geode.
Step 1: Crack open an egg but in a sophisticated way. Make sure the hole you make is the size of a 1-rupee coin. Take out the content in a bowl and do the same thing on another egg. Make a few of them.
Step 2: Make hot water and set the empty shells in. Wash them very carefully without cracking them more. Put your thumb inside and gently remove the membrane that holds the egg white and yolk. Set the washed egg shells on a towel and dry them. You can use an egg dye to colour the external part of the shells. It is optional.
Step 3: Hold the shells and brush glue inside the surface. Dust the glue layer with Epsom salt before it dries. These particles of the salt will act as starter crystals for further crystallisation and growth inside the shells. It will take a few hours to dry the inside layer.
Step 4: Boil water and put it in a cup. Add a ½ cup of Epsom salt to it. Stir it continuously until it gets dissolved properly. Don’t add the entire salt at a time. Add in small amounts and continue stirring. You will find out that the water will not be able to hold salt anymore. Stop dissolving more salt. When cooled, it will become a supersaturated solution of Epsom salt.
Step 5: Use a spoon or a ladle to pour the supersaturated solution into the empty and dry egg shells. Fill it to the top. Add food colouring to each egg and gently stir using a toothpick. Do not use any spoon as it will crack open the dry egg shells. Do the same thing for other egg shells.
Step 6: Place all these shells at room temperature on an egg carton for stability. Check them daily. As the solution will become clearer, you will find a thin layer of salts forming inside the egg shells.
Step 7: You can open the egg a little more to hasten the evaporation process. The faster it evaporates the better the crystal powder settles down inside. When the solution is totally dry, you will find breathtaking crystals formed with beautiful colours inside the egg shell. Your homemade geode is ready for display.
People also make fun by creating an artificial geode cake. The same process of crystallisation is used to make such an innovative cake. It is the ideal birthday gift for a rock enthusiast or a geologist. Don’t you think?
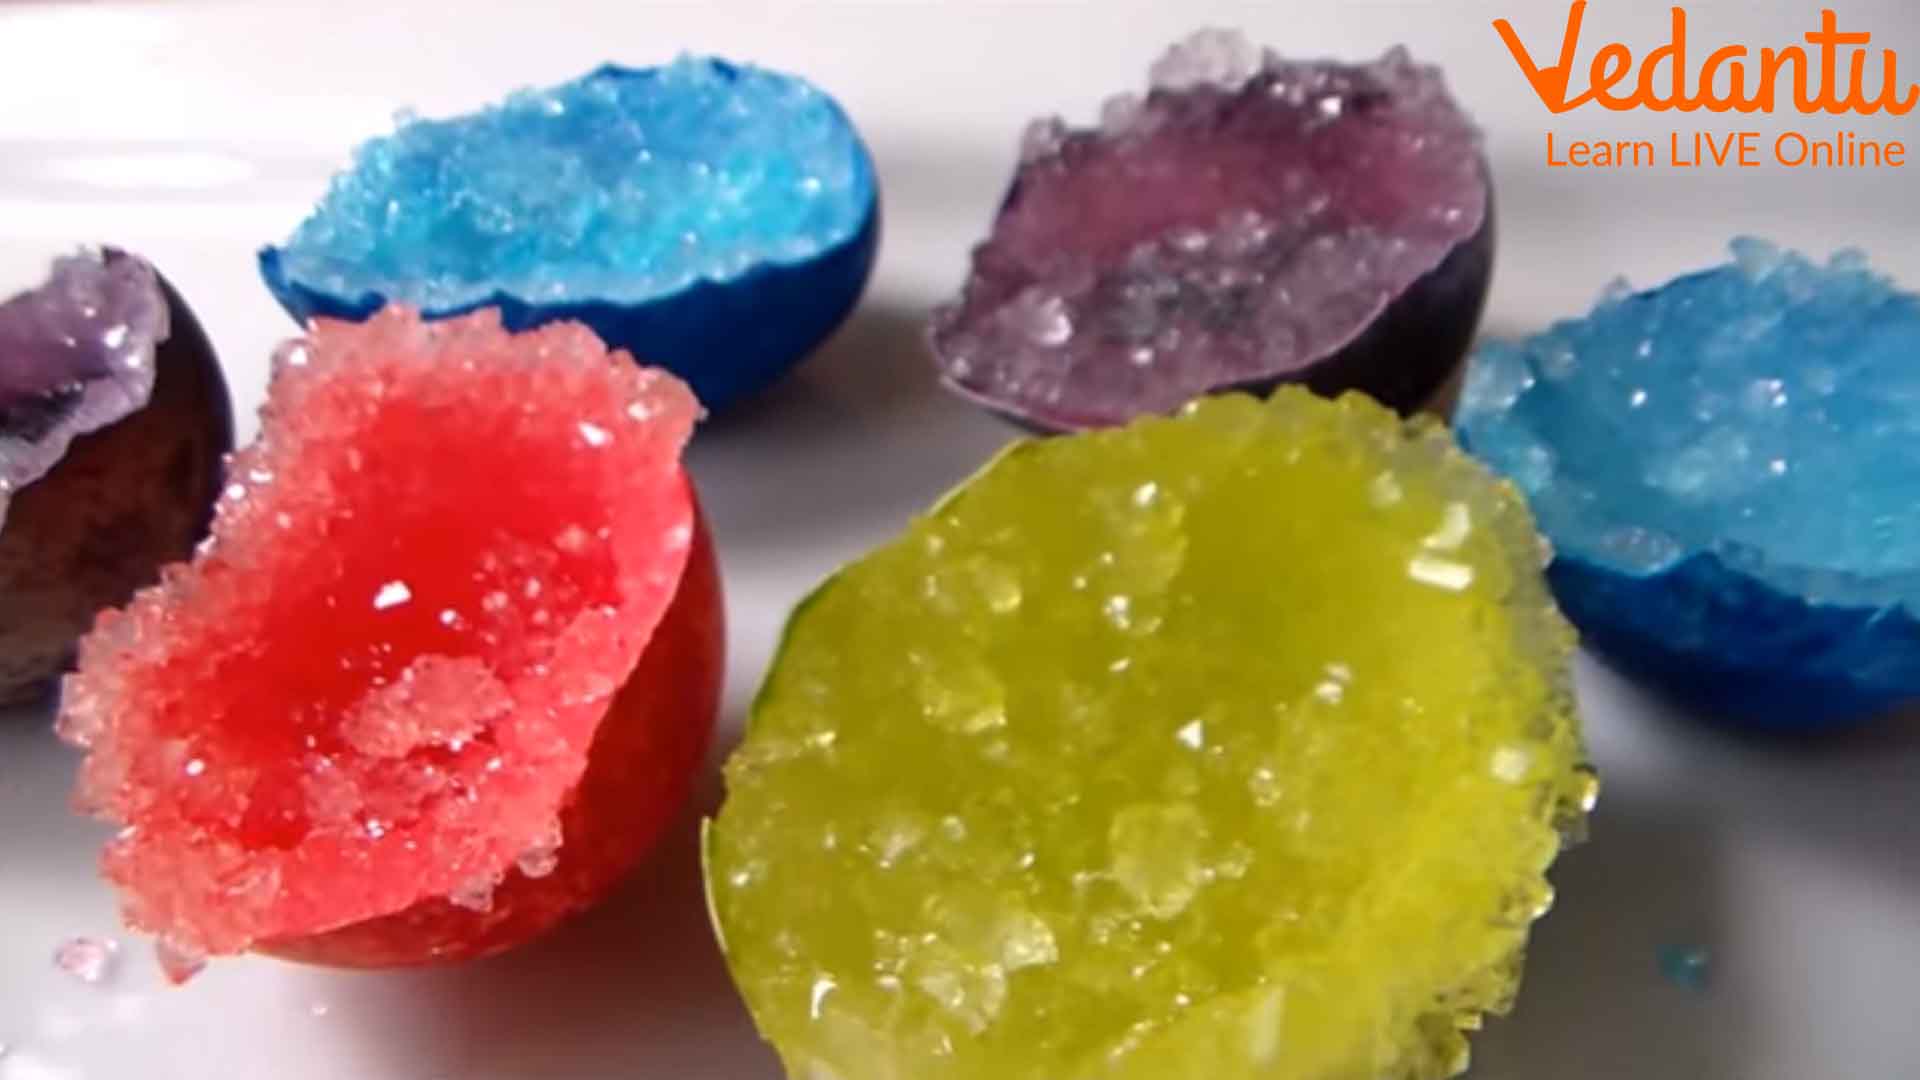
Egg Geodes Made at Home
How did the Crystals Grow Inside the Egg Shell?
This is a natural phenomenon where a supersaturated solution tends to lose the solute content as the temperature drops to normal. When the solution started losing solvent or water, in this case, the salt molecules started to stick to the ones already present in the glue layer.
As the solution dried up, the crystals started to grow in shape. The natural formation of sharp and glossy crystals with food colours replicates the natural process of geode crystal formation. You can also take alum as a good crystallising salt for excellent results. The food colouring is not for the crystalline salt though. It just colours the egg shell giving the artificial geode a perfect shape.
Conclusion
To make your homemade geodes more dramatic and beautiful, throw sparkling light inside. The internal part of the egg shells will glow by reflecting lights. This is how you can make a geode by simply using things available at home.
Use this idea as a science project and explain to your teachers how geodes actually form. They are fragile sedimentary rocks with hard coverings and softer crystalline cores. You will find your homemade geodes quite similar to the natural ones. Make a display case for making your homemade geodes look elegant.


